
What is the purpose of sequence diagrams?
Sequence diagrams are one of the 14 different types of Unified Modeling Language (UML) diagrams. While some of these diagrams, such as class diagrams or object diagrams, are designed to show the static structure of a system, a sequence diagram shows how the system behaves over time and how the different parts of the system interact during that time frame.
A sequence diagram captures messaging between objects in a system and indicates which object is active at any particular point in the process of carrying out operations. Sequence diagrams help a software engineer or developer visualize the order in which events occur and how they trigger activity within the system.
Sequence diagrams use a horizontal axis for the objects being modeled, with the vertical axis showing how time progresses from top to bottom. Objects are activated as messages travel back and forth on the horizontal axis. These messages are shown as arrows that can go both left and right. Each object has a lifeline that descends vertically and this lifeline will show an activation bar if the object is active.
You can also model situations where one or more optional or alternative events take place. These are shown in a special frame in the diagram and let you create complex alternative paths for the system.
Make your own UML sequence diagram with Gleek.
Check out our detailed page on sequence diagrams for a full rundown on the elements and a pro cheat sheet for using Gleek syntax to create them. You might even like to keep this open while you go through this guide.
Step-by-step guide to creating a sequence diagram for an online shopping system
Making a purchase online involves a lot of back and forth between the user, the store, the payment gateway, and even potentially a bank, if a transfer is involved. That makes this kind of system perfect for describing with a sequence diagram. So let’s get to it!
First, open up the Gleek.io app and select sequence diagram from the dropdown. That will tell Gleek what kind of diagram you want to create, so that it will draw the elements correctly. Don’t forget that you can also create other types of diagrams, such as flowcharts and entity-relationship diagrams!
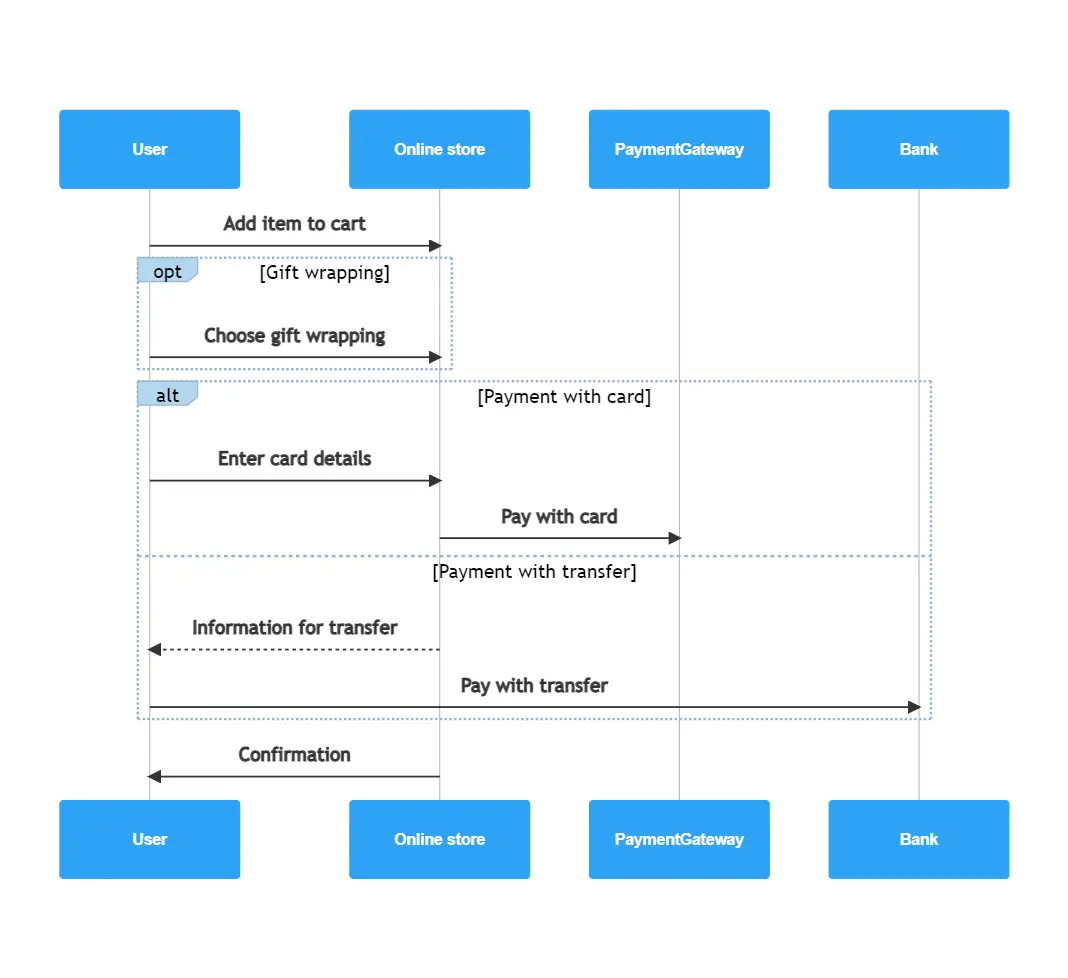
Because we’re modeling a sequence in time, we’ll dive straight in and start at the point where a customer has decided on their purchase. The first step is to add an item to the shopping cart. We’ll need two objects – the user and the online store. In Gleek, you just type the name of each object and connect them with a labeled arrow to show the objects and the message being transmitted between them.
Here’s the syntax. You just type a hyphen, add the text for the label, another hyphen and end with a chevron to create the arrow.

And here’s how it looks after Gleek has instantaneously converted the text into a diagram.
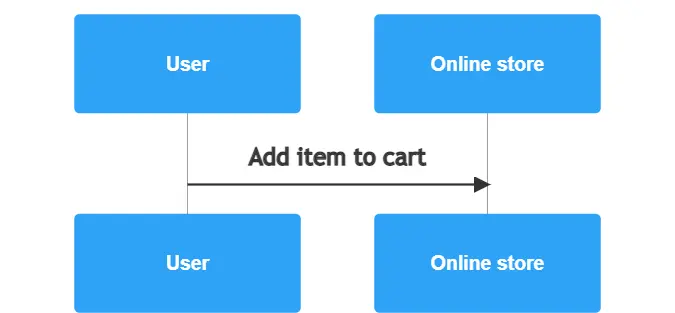
You’ll notice that Gleek automatically creates a lifeline for each object and the message, or action, is transmitted from left to right. The user has added an item to the cart and that sends a message to the online store.
Lots of other things are probably happening in the system that supports the online store, such as the shopping cart being updated in the database, the item count in inventory being changed, but we don’t need to worry about those for now.
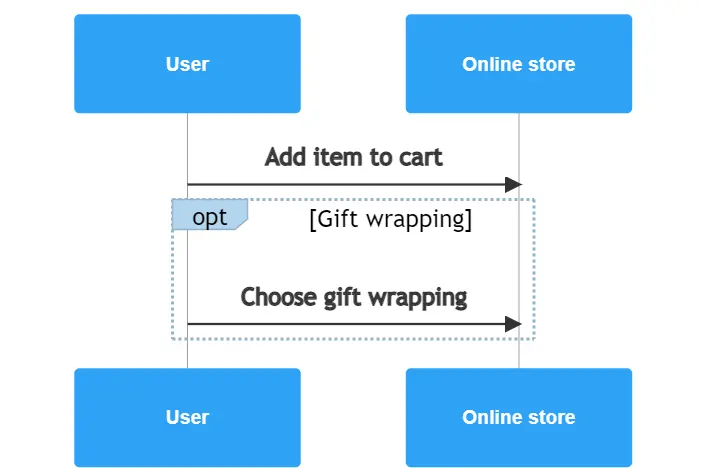
Now we’re going to tackle a simple conditional case. You can read a lot more about these in our detailed blog post about sequence diagram fragments, but for now you just need to know that this optional case will be shown as a rectangular frame over the diagram, with a label in the top left. Because our first fragment is optional, we’ll use the opt label.
Our online store is going to offer the customer the option to choose gift wrapping. If it’s a present for a loved one, they’ll definitely want to choose this! But if it’s just for themselves, they’ll probably ignore this option.
Again, it’s really simple to do this in Gleek. Just type forward slash, the word opt, and give the fragment a name such as “Gift wrapping”. Then tell Gleek what message the user can send to the online store.

This syntax will be rendered like this in Gleek. Note the frame over the diagram and the opt label.
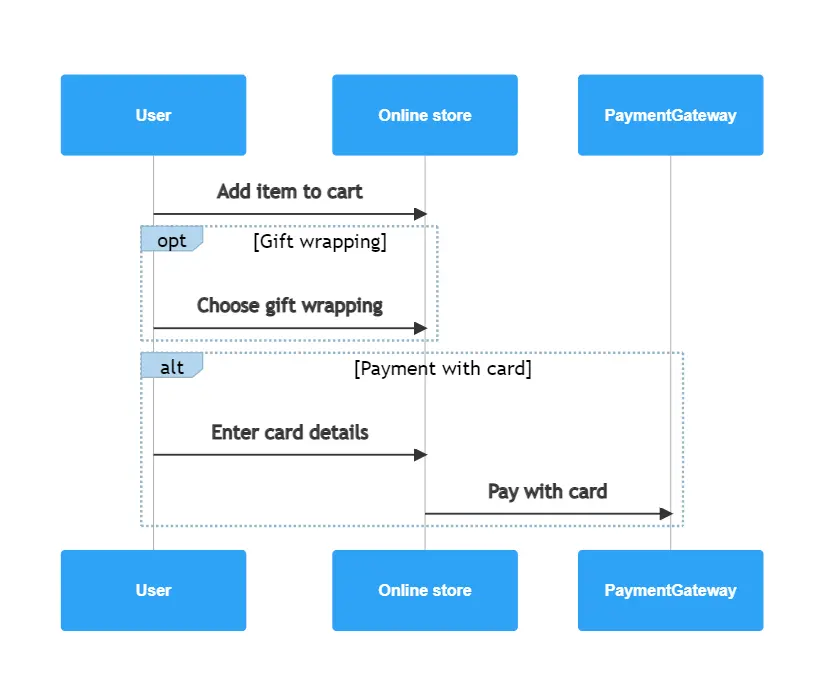
Now we can start to involve the other objects that we need in our sequence diagram, the payment gateway (for instance, PayPal or Stripe), and the bank.
Dive into a new tutorial where we introduce an AI chat and create a sequence diagram for Microservices.
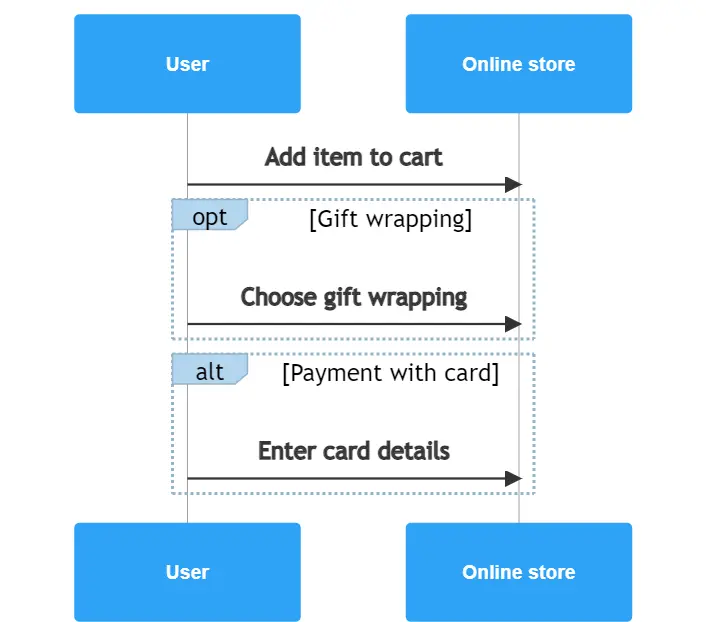
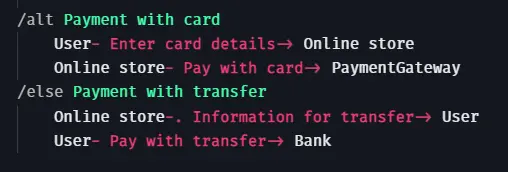
For this, we’ll use a different fragment, because we’re going to give the user a choice between paying by card or by bank transfer. To do this, we need to create two alternatives framed by an alt fragment.
The first stage in this is to type a forward slash followed by alt. Then enter the possible messages that are sent. First, the user enters their card details on the online store. This sends a message from the user to the store.

The online store then needs to communicate with the payment gateway. This lets the user pay with their card.

This first part of the alternative frame is nicely boxed off, but now we need to deal with the second part of the alternative, to cover a customer who wants to pay by bank transfer. This uses an else label to show that it is selected if the first alternative is not used.
Make your own UML sequence diagram with Gleek.
The online store has to give the user the bank details they need to make the transfer. This message will therefore go in the opposite direction from the previous messages and go back to the user. This is known as a reply message and is shown with a dotted line with an arrow. Just add a period after the hyphen in Gleek to create a dotted line. You can read more about the types of messages in a sequence diagram in our detailed page about creating sequence diagrams in Gleek.
The user can then go ahead and complete the transfer. This will send a message to their bank.

The final stage in the purchasing process is that the online store sends a confirmation message to the user and this ends the part of the sequence diagram that we want to model.
You can already probably see lots of ways that this diagram could be expanded. If you want to try experimenting with sequence diagrams in Gleek, you can go straight to editing this example and make as many changes as you want!
Looking for even more examples? Check out the detailed explanation on how to create sequence diagrams for user login and ATM withdrawal. For even more examples go to our templates page.
Related posts
Sequence diagram for ATM withdrawal: a step-by-step guide
Sequence diagram for microservices with Gleek AI
How to create a user login sequence diagram
Sequence diagram for library management system