
What is a class diagram and what is it used for?
Class diagrams are one of the most popular Unified Modeling Language diagrams. For over 20 years, the UML standard has provided software engineers with a standardized way to visualize and diagram systems before starting to code. Class diagrams are great for sketching a static overview of a system so that all stakeholders can make sure that their requirements will be met.
In a class diagram, each class acts as a template, or blueprint, for a type of object that can exist in the system. Each class has attributes and methods.
Make your own UML class diagram with Gleek.
Attributes are the characteristics of the class and represent data elements that will need to be stored for the class. Methods are the ways in which the class interacts with other classes and explain the types of communication or messages that will need to be created. Methods are also known as operations.
A class is represented in a class diagram as a rectangle with three different sections. The top part of the rectangle contains the name, the middle part contains attributes, and the bottom part contains methods.
Modeling an ATM system with a class diagram
Let’s create an example of a class diagram. We’ll use a bank ATM system so that we can model a few different interactions between classes. First, we need to work out what classes we need.
What classes do we need to create?
In the real world, each of these classes might have a lot more attributes and methods, but we’ll keep things simple and only model what we need.
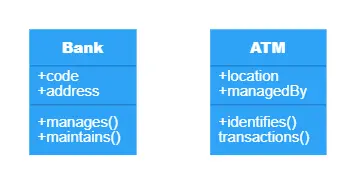
We can start with the Bank class. The bank needs a code to identify it and an address. The methods that the bank class can use to interact with its ATM are manage and maintain.
In Gleek, you create a class by just typing the name of the class, hitting enter and then the tab key, and then adding your attributes and methods. You tell Gleek that something is a method by adding parentheses after it.
Check out Gleek's new article on How to create a university management system class diagram via Gleek AI chat.
The following simple lines of Gleek syntax is all you need to create a class for your class diagram.
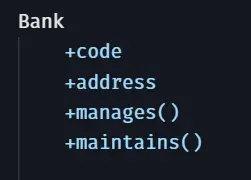
The plus symbols just indicate that these attributes and methods are public. You can read more about this in our detailed look at UML class diagrams.
Next, we need to create an ATM at the bank. The ATM is managed by the bank and it has a location. Its methods are related to transactions, which it identifies and carries out.
We should add a line between the bank and ATM classes to show how they work together. That’s really easy in Gleek. Just type the following line after your classes.

The label “maintains” explains the relationship between the bank and the ATM, while the number one in curly brackets tells us about the cardinality of the relationship. In this case, a bank can have one ATM. You can read more about cardinality in our detailed class diagram page. Don’t be afraid to experiment if you want to try out all the different possible cardinality options. Gleek will suggest autocompleted syntax when you start typing, so that’s a great way to learn what works.
Make your own UML class diagram with Gleek.
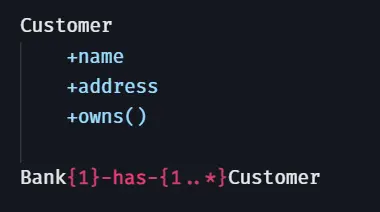
Every bank needs customers, so we’ll create the Customer class. Customers need a name and an address. The relationship between the bank and the customer is that the bank has customers.
Here’s the syntax for that in Gleek.
And here’s the resulting diagram.
Now that you’re familiar with the Gleek syntax, let’s just create each class. You can explore the full syntax for the diagram in the example at the end.
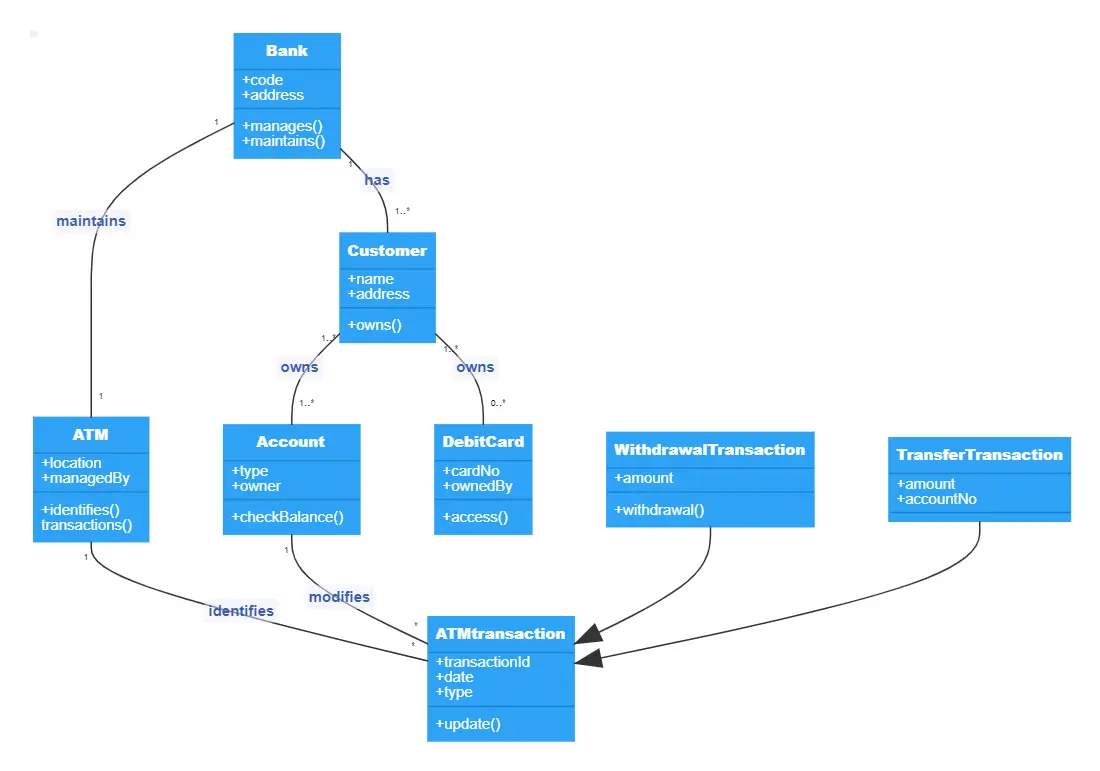
The only method for the customer is to own an account and to own a debit card. Let’s create those two now. An account is owned by a customer and also has a type, such as savings or checking. It has a method to enable it to check the account balance.
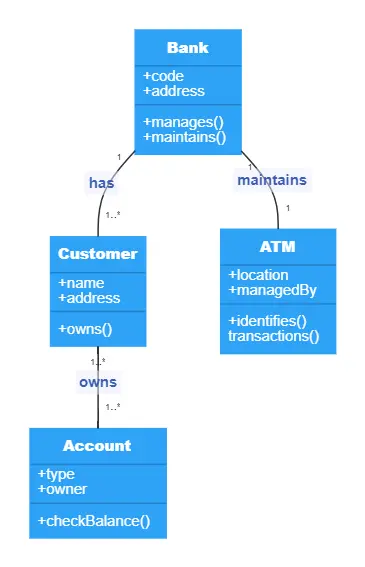
The DebitCard class has a card number and is also owned by a customer. Its method enables it to access the ATM and therefore the account.

Now we need to model the transactions that can take place when the customer uses the ATM.
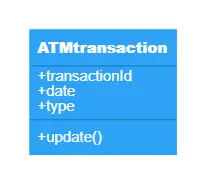
The base class for this is ATMTransaction. It has three attributes: transaction ID, date, and type. Its method is to update.
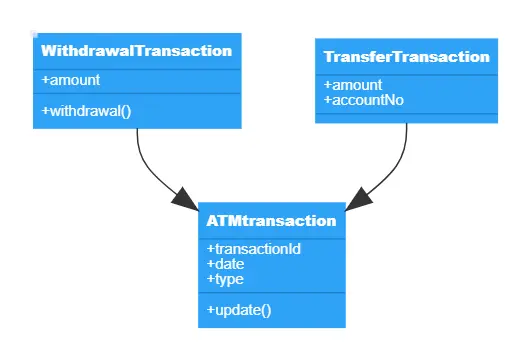
Let’s imagine that the customer can perform two different types of transactions. They can withdraw funds or they can transfer funds to another account.
For the first, we need a WithdrawalTransaction class. That has an amount attribute and a withdrawal method. The second is covered by a TransferTransaction class. This also has an amount attribute, but in addition it has an account number attribute so that the customer can send the money to a different account.

These last two classes are special, because they share the ATMTransaction class as their parent class. That means that they can inherit functionality from the parent class. For instance, these transactions can make use of the update method to interact with the account class. You can show inheritance in a class diagram by using solid arrows.
If you want to learn more about how different lines and arrows can represent different relationships in a class diagram, check out our blog post about UML class diagram arrow types.
Putting it all together in an ATM class diagram
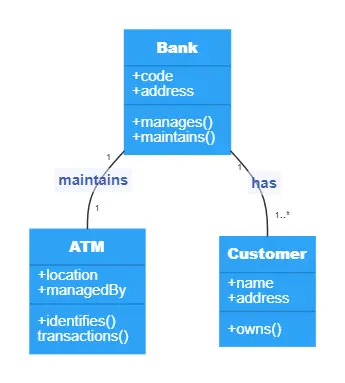
We have all the classes we need, so our finished class diagram now models the interaction between the bank, a customer, the ATM, and the customer account.
The bank class has customers and it maintains the ATM.
The customer owns an account and also owns a debit card.
The ATM identifies an active ATM transaction and the transaction can in turn modify the customer account.
Make your own UML class diagram with Gleek.
And here’s the finished diagram, with all relationships included.
So that’s a basic class diagram that shows you how easy it is to sketch out how a system works! If you’re curious about the rest of the syntax, you can edit this example yourself over on Gleek.io. Try it out and see if you can add any other classes or interactions that might be needed by our imaginary bank and customer. Check another example on the ATM withdrawal sequence diagram.
Learn more on how to create a class diagram in our tutorials for Library management and Restaurant management systems.
Related posts
University management system class diagram with Gleek AI chat
Hospital management system class diagram using Gleek App
What an association relationship is in UML?
How Class Diagrams Are Evolving in Modern Software Engineering
UML class diagram arrow types: explanations and examples
How do we create a Class diagram for a Library Management system?
What is multiplicity in a class diagram?
UML relationships explained: Dependency, Realization, Association