
What are class diagrams and what are they used for?
Class diagrams are an amazingly versatile type of UML diagram. They can be used in all kinds of software development to rapidly sketch out an informal diagram of how a system should be built. Because class diagrams are easy to understand, they can be shared with non-technical stakeholders so that mistakes aren’t made in the early stages of designing a system or database. Once the class diagram has been created, it will serve as the blueprint for the system going forward, and preserve the initial requirements and design decisions.
Make your own UML class diagram with Gleek.
A class diagram shows a static view of a system. It includes the classes, or types of objects, that will exist in the system. It also shows the attributes, or characteristics, of these classes, and the methods, or the way that each class will interact with other classes. When the software engineers designing the system have all this information in a single diagram, they can easily see at a glance how it will fit together and how the relationships between classes will play out.
Class diagrams are easy to create. A class is just a rectangle with three segments: name on top, attributes in the middle, and methods at the bottom. Connecting, labeled lines between classes represent the relationships between them. These classes act as templates for the objects that will populate the system.
How to create a class diagram for a restaurant management system
Class diagrams can be used to model lots of different types of systems, from library management to ATM systems, as well as an online shopping system. For this example, we’re going to design a restaurant management system from scratch. You’ll learn what classes you need to create, the attributes and methods they should have, and how the classes interact to make sure the restaurant runs smoothly and processes orders all the way from the chef to the table!
We’re going to use the handy Gleek diagramming tool for this example. Gleek is unique when it comes to creating diagrams because it enables you to draw diagrams using simple text syntax. No fussing with images or drawing tools. Gleek draws what you type.
Check out Gleek's new article on creating a class diagram for a University management system using AI chat.
So go to the Gleek app and sign up for a free account if you haven’t already. Use the dropdown in the code field to select “Class diagram” and you’re ready to go.
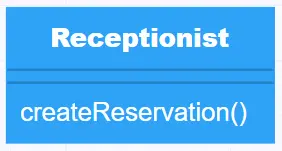
First, we need to work out the classes we need to include. Let’s start at the table reservation stage. We need a member of staff who can create reservations. We can call that person the Receptionist.
The Receptionist class doesn’t need any particular attributes to be captured by the system, but does need a method to create the reservation. Remember that the method determines how the class can interact with other classes.
The syntax in Gleek to create a simple class like this is easy. Just type the word “Receptionist” then hit enter and the tab key to add the method “createReservation()”. The parentheses tell Gleek that this is a method. Gleek will draw your first class like this:
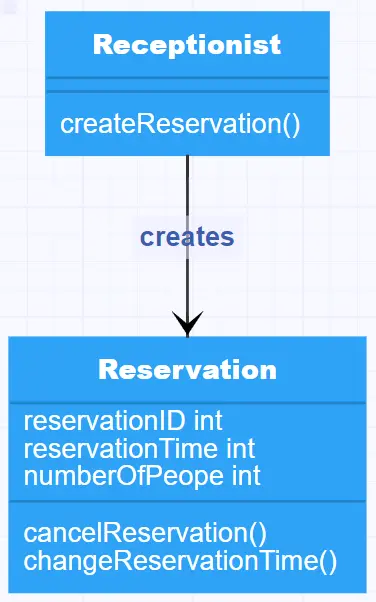
That method enables the receptionist to create a Reservation. And that gives us our next class.
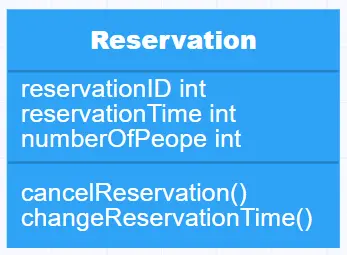
The Reservation class needs some attributes and some methods. It needs a “reservationID” to keep it unique. It needs a “reservationTime” to track the time when the guests will arrive. And it needs “numberOfPeople” to track the number of guests. The Reservation class also needs a couple of methods. It needs the ability to cancel the reservation or change the reservation.
The relationship between Receptionist and Reservation is straightforward. The receptionist “creates” the reservation. You just need to add a line like this to Gleek:
Receptionist-creates->Reservation
And it will draw an arrow between your classes:
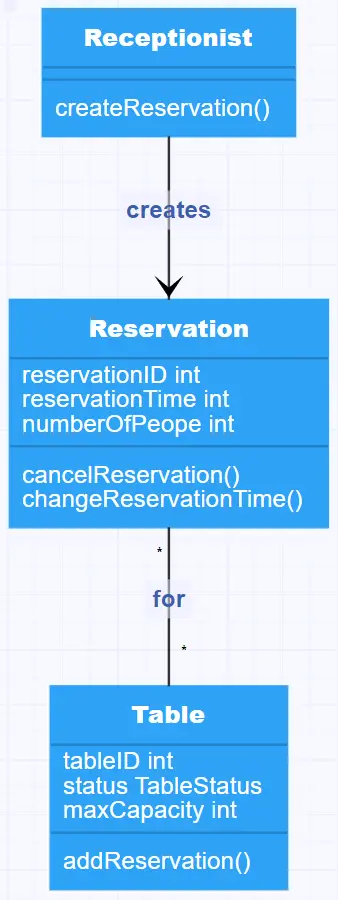
The next class is Table and it needs a unique ID, in other words, its table number, and it also needs a status, as it might be out of service or already reserved. It also needs a “maxCapacity” attribute so that the correct number of people can be seated. As for methods, it just needs a way to add the reservation.
There’s also a direct relationship between Table and Reservation. The reservation is made “for” a particular table, so that the restaurant doesn’t overbook and matches the number of guests to the right table. In this case, the relationship will also have cardinality, so that it’s clear to the designer of the system that a many-to-many relationship exists between these two classes.
Here’s the syntax in Gleek. The asterisk in curly brackets means that there can be many reservations for many tables.
Reservation{*}-for-{*}Table
And here’s the resulting connections between our first three classes:
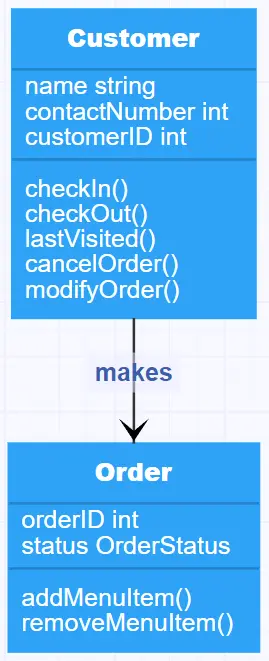
Now we assume that the guests have arrived and are seated comfortably at their assigned table. This is a high-tech restaurant where customers can check in on their smartphones and submit their orders. That means that each customer is part of the system. So now we need a Customer class and an Order class.
The Customer class needs a few basic attributes such as name, contact number, and unique customer ID. They also need some methods to interact with the system, such as “checkIn”, “checkout”, “lastVisited”, “cancelOrder”, and “modifyOrder”.
The Order class also needs a unique ID, a status, and the ability to add or remove menu items (you can probably guess what class we’ll be adding next).
The relationship is a straightforward one this time. The customer “makes” an order.
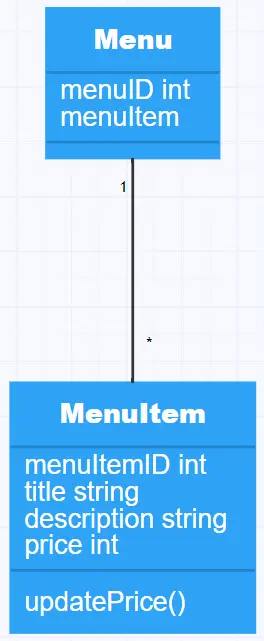
As you probably expected, the customer also needs a menu and the menu needs to be filled with tasty dishes for the customer to choose from. That brings us to the Menu and MenuItem classes.
The Menu class doesn’t need any particular methods, but it has two attributes, while MenuItem has a range of attributes and a single method. The relationship is simple, but it illustrates one-to-many cardinality, because one menu can have many menu items. The syntax for this should be familiar to you by now:
Menu{1}–{*}MenuItem
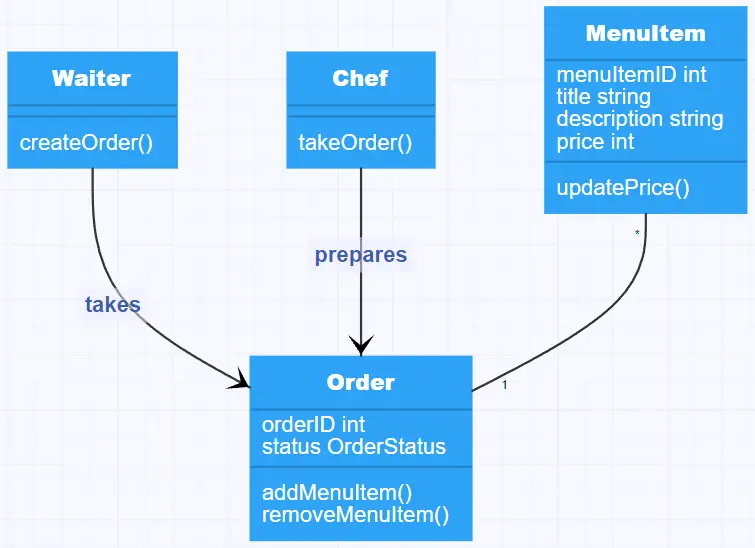
Enter another two classes, the Waiter and Chef. They have a relationship to the Order class, in that the waiter “takes” the order and the chef “prepares” the order. The MenuItems class also has a relationship to the Order class, as menu items can be added or removed as part of its methods.
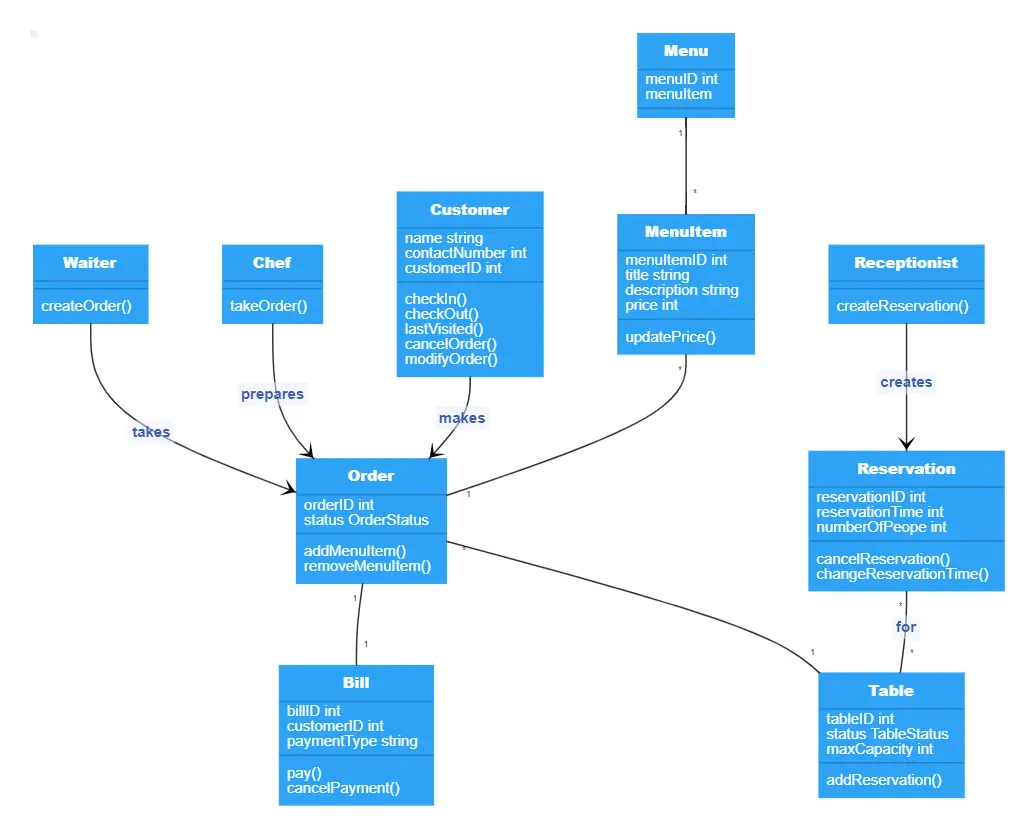
To bring it all together, we need to add the last class, the Bill. The guests have enjoyed their evening, but it’s time to pay. The Bill class has a one-to-one relationship with the Order class and will need to have a unique ID, record the customer ID, the payment type, while it will just need two methods, one to pay and one to cancel the payment in case the restaurant owner is feeling especially generous 😊
Related topic: Hospital management system class diagram using Gleek App
Let’s add the Bill class and show you the whole diagram in action:
Make your own UML class diagram with Gleek.
You can edit this diagram yourself over on Gleek. Make some changes and see how you might design your restaurant management system using a class diagram. You might also like to check out UML class diagram arrow types to explore the kinds of relationships you can create between classes.
Related posts
UML Class diagram for online shopping: Step-by-step tutorial
Hospital management system class diagram using Gleek App
University management system class diagram with Gleek AI chat
UML class diagram arrow types: explanations and examples
How do we create a Class diagram for a Library Management system?
UML relationships explained: Dependency, Realization, Association